
Maybe you grew up carving Jack-o’-lanterns and you want your kids to follow in your footsteps. Who can blame you? Carving pumpkins is a gooey-messy-blast for the whole family. For many of us, it’s a time-honored tradition. But exploring other options isn’t about turning pumpkin-carving into a Pinterest-perfect art form - it’s about having fun decorating in a variety of ways. Why not try mixing things up this year?
Select pumpkin color and size according to taste, and embellish away! You’ll be amazed at how many looks a simple pumpkin can pull off. For best results, choose a pumpkin with a smooth, unblemished surface. Wash your pumpkin gently with mild soap and water, and allow it to dry overnight before you begin decorating. Most of these looks work best for medium-sized to smallish pumpkins.
1. Polk-a-dots galore. Give very young children a pumpkin and a pile of sticky felt circles. Show them how to adhere them to their pumpkin, and they will be happily entertained for quite some time. Polk-a-dots are the simplest approach for the youngest in your clan, but you can also create a more traditional look using black felt shapes on an orange pumpkin.
2. The glittering globe. Coat the pumpkin in a layer of Mod Podge or white glue, then sprinkle the entire pumpkin with glitter. Or mix a few glitters in advance for a multi-color look. If you want to do a variety of colors, coat only a portion of the pumpkin, then sprinkle glitter over just that portion. Catch extra glitter on newspaper and pour it back into the container. For best results, let sections dry between applications of new colors.
3. The painted lady. If you want your painted pumpkin to last, coat it with a layer of varnish or sealer first in a well-ventilated area. Flip the pumpkin over onto a bowl or a jar while you paint the bottoms first. When dry, flip it over to paint the rest. Apply a couple of coats of acrylic paint. Chalkboard paint works well on pumpkins. Apply another coat of varnish to painted pumpkins for longest-lasting results. Leave chalkboard painted pumpkins unvarnished.
4. The glitter-paint combo. If you want to mix things up a bit, follow instructions for painting your pumpkin. Then, when completely dry, apply glitter to the pumpkin stem only. Or use blue painter’s tape to create designs on the pumpkin. Then apply glue and glitter for added sparkle.
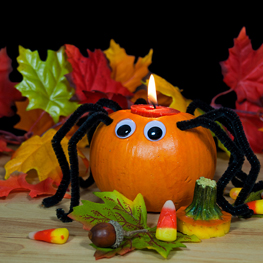
5. All wrapped up. Turn your pumpkin into a spider web by wrapping it randomly all over with thick white twine. Then hot glue a large black spider onto the web to finish the look. For a mummified look, cut cheesecloth into long, wide strips. Fold strips to double thickness and spray with fabric stiffener. When dry, wrap strips around the pumpkin, leaving the top and bottom clean. Secure strips with hot glue. Hot glue googly eyes and wrap with a few more strips so eyes are peeking out. Cut away a thin mouth and dab inside with black paint. When dry, coat fabric with glow-in-the-dark craft paint.
6. The doodle work-of-art. Teens and up who enjoy drawing will relish the opportunity to create temporary works of art on pumpkins using Sharpie markers. Supply them with a rainbow of colors or an array of black markers in various thicknesses. Sharpie art using black and colored markers works especially well on white pumpkins. And black markers of various thicknesses look great on orange pumpkins. Varnish afterward for a longer-lasting work of art.
7. The drippy look. Spread out newspaper or brown bags to catch any excess. Unwrap crayons in assorted colors. You can either do a spectrum of colors or mix things up. Consider autumn colors on an orange pumpkin or ghoulish colors on a white pumpkin. Glue down crayons (just the top half) with points facing out and tipped slightly down around the pumpkin stem with a thick, white, non-flammable glue. Let dry. Set a hair dryer to high and work your way around the crayons one at a time until they are melted to your satisfaction.
8. The collaged gourd. Mod Podge works well for applying paper or fabric to pumpkins. If you want a more polished look, paint the stems ahead of collaging. Then choose tissue paper, old book pages, hand-made paper, printed paper napkins or fabric quilting scraps for best results. Cut material into squares or strips. When using strips, cut the ends into points so they will smooth easily. Apply a layer of Mod Podge under and over the material. Smooth the materials with your fingers as you go. Add embellishments as you wish, like ribbon, on the dried pumpkin.
9. Bling-kin. Paint the pumpkin with two coats of paint. Then starting at the stem, work your way down the sides of the pumpkin with gem stickers. Create an evenly spaced over-all pattern or a dripping-with-gems look. Combine gems with an adhesive letter sticker, if you like, for a monogrammed look. Leave gems off the bottom so the pumpkin stands flat.
10. Stamp-a-pumpkin. If you wish to change the color of your pumpkin, paint your pumpkin first. You can also paint your stem, if you like. To achieve a stamped look on your pumpkin, don’t try to stamp directly on the surface. Instead, take white tissue paper and stamp it using archival quality ink with the image or images of your choice. Allow the ink to dry thoroughly and then Mod Podge your tissue carefully to your pumpkin. Add additional collage elements to the top and bottom of the pumpkin to frame your stamp, if you like.
Try using matching tissue paper or paper napkins around the top or bottom of the pumpkin for a complimentary look.
Tips for the Traditional Jack-o’-Lantern Approach
Send kids outside for scooping pumpkin guts to minimize the mess indoors. If the ground is wet, spread out a vinyl tarp that can be washed off with a hose. Cut the pumpkin open about three inches around the stem; scoop with a sturdy scooper. Really scrape pumpkins clean inside and they will last longer. Make carving safe for younger children by using sturdy pumpkin-carving tools rather than kitchen knives. Draw designs on the pumpkin with washable marker first, then follow your pattern for best results. When finished, spray the pumpkin inside and out with Clorox Clean-up Cleaner With Bleach, so they will last longer. Allow to dry thoroughly before adding candles or use flameless candles right away.
Author and journalist Christina enjoys the results of carving pumpkins, but the messy process? Not so much. This year she is looking forward to turning her front porch into a gallery of pumpkin art with the help of the whole family.


Calgary’s Child Magazine © 2024 Calgary’s Child
