There are a lot of fun activities to do outside during winter but when that temperature goes below -30, keeping warm inside is the way to go.
To keep your kids entertained indoors during these cold winter days, here are five Science, Technology, Engineering, Art, Math (STEAM) crafts to help keep them busy:
Slime
This one is a classic that provides hours of fun for kids.
In a plastic disposable container, put in some glue. Add drops of food coloring to your liking. Then add liquid starch, about 5 to 10 drops at a time, mix well. Do the last step until a slime is formed. Rinse the slime with cold water.
To make a glittery-slime variation, add glitter to the glue instead of food coloring. Then proceed with mixing in liquid starch until a slime is formed.
Another fun variation is magnetic slime. Before making this variation, make sure to wear a mask to prevent you from inhaling the iron powder. To make this, add two tablespoons of iron powder to the glue instead of food coloring. Then proceed with mixing in liquid starch until a slime is formed. The kids can make the slime ‘move’ by attracting it with a Neodymium magnet.
Gummies
The kids will have fun making gummies but beware of the sugar high that comes after eating them!
In a cup of boiling water, add one packet of flavored and three packets of unflavored gelatin. After the powder has completely dissolved, and while the solution is still hot, place the liquid in silicone molds. There are a lot of fun-shaped molds on Amazon. Let the gummies set. Once set, they are ready to eat!
Use sugar-free flavored gelatin if you prefer. Or you can use splashes of sugar-free drink flavorings added to unflavored gelatin. Just make sure to use four packets of gelatin per one cup of water.
Magic Crystals
These crystals can be turned into treasures that pirates are looting! Arrr…
Add about three tablespoons of borax to a container. A clear container would work best so the kids can see the crystals forming. Pour in about half a cup of boiling water into the container, mix until dissolved. Fold a pipe cleaner in half and soak about half inch of the folded part into the container. Crystals will slowly form on the pipe cleaner in a couple of hours. Leaving the crystals to form overnight would be best. Remove the pipe cleaner from the solution and rinse the crystals with cold water. Then let your kid’s imagination run wild!
Food coloring added to the water can change the color of the crystals. Also, neon-colored pipe cleaners make for some amazing-colored crystals.
* Editor's Note: Borax can be irritating to skin, eyes and lungs. Make sure to supervise your children when playing with their crystals.
Light-up Magic Wands
This one is for the Harry Potter fans out there.
You will need three large craft sticks for this project. Cut about an inch off one stick (Stick A), run copper tape on this small portion. On another stick (Stick B), attach one end of an LED bulb using copper tape. Run the copper tape through the entire stick. On the third stick (Stick C), attach the other end of the LED bulb using copper tape. Run the copper tape through the entire stick. On Stick C, remove about an inch of copper tape, about three-quarters from the bottom. Then at each end of the copper tape, run more copper tape around the stick - this is your circuit breaker. Place the long part of Stick A in between Stick B and C, use electrical tape to secure them together. Attach the smaller portion of Stick A to the outer portion of Stick C, using electrical tape, creating a hinge that will cover the gap between the copper tape rings on Stick C- this is your on/off switch. Slide a CR2032-3 battery into the bottom part, in between Stick B and C. Test your circuit by holding the battery in between the sticks and depressing the on/off switch. The bulb should light up. If it doesn’t, turn the battery around, then test again. Once the bulb lights up, secure the battery using electrical tape.
If you want to create a Harry Potter-like wand, add some glue from a glue gun to create rope or branch-like effects. Once that’s dry, paint with craft paint.
Then it’s time to practice those spells!
Visit calgaryschild.com for instructions with photos for this craft!
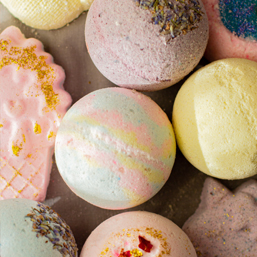
Bath Bombs
Let’s turn bathing into a science experiment to make it more fun!
In a container mix a cup of baking soda, ¹₈ cup corn starch, ¼ cup citric acid, and ¼ cup Epsom salts. Then in a separate container mix three tablespoons of castor oil, ½ tablespoon of water, drops of food coloring (have fun mixing colors), and 5 to 10 drops of essential oil. Add a small amount of the liquid mixture into the dry mixture at a time, then mix well. Repeat this step until everything is mixed. Press the mixture into molds, then leave overnight to harden. Once the bathbombs come out of the mold, it’s bath time!
Some tips:
Now what are you waiting for? Gather up those materials and let’s get crafting!
Fueled by strong coffee and a Gemini personality, Klynne shares ideas on living a minimal organized life full of adventures. For creative ideas on how to elevate frugal to luxury, visit thisfamilylifewelive.com.
Calgary’s Child Magazine © 2024 Calgary’s Child